Winter is starting to show its bite.
The temperatures are starting to dip into the low 30s (F)so the greenhouse needed two electric heaters just to keep warm.
None of the orchids are showing any signs of complaining though. I guess they know that any temperature inside the greenhouse will be a lot better than outside.
A couple of mornings already, we woke up to see everything coated in a light layer of frost. Most of the trees in the backyard are starting to go into dormancy.
Wednesday, December 24, 2008
Friday, November 07, 2008
10/07/2008 - Some orchids in bloom
Just some orchids that are in bloom in the greenhouse.
A NOID Dendrobium mounted on driftwood.


Another NOID Dendrobium mounted on driftwood.


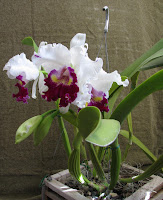
Cattleya Hawaiian Wedding Song 'Virgin'


A NOID Dendrobium mounted on driftwood.


Another NOID Dendrobium mounted on driftwood.


Cattleya Hawaiian Wedding Song 'Virgin'


Tuesday, October 28, 2008
10/28/2008 - Lc Longriver Compton 'Golden Star' FCC/AOS
Here's one for all you floofy fans.
Large plant, large flowers.


Large plant, large flowers.


Thursday, October 09, 2008
10/09/2008 - C. Hawaiian Wedding Song 'Virgin' x Self update
Here is the growing seed pod.
I anticipate it to be much bigger in the coming weeks.

I anticipate it to be much bigger in the coming weeks.

10/09/2008 - October weather swings!
Yes folks, it is October again - the season of the dreaded drastic diurnals for my local area.
This is the usual time when summer and winter forces are duking it out and leaving dead orchids in their wake. And add to that the occasional Santa Ana winds and you could have dead plants from your neighbor's garden landing in your yard.
Daytime highs can peak at 100F outside the greenhouse and then dip into 50F at night.
So during the day I have the greenhouse in "summer mode". Misters active, exhaust fan and HAFs running full blast, etc.
But after sunset its time for "winter mode", I shut off the water supply, bring the electric heater into the GH plug it in and make sure all the auto-vents have sealed shut.
The next morning, I remove the heater and open the water supply and the cycles starts all over again.
I cannot leave the heater inside the greenhouse during the day because I dont want to risk getting it wet or damp with the misters active. The last thing I want is a deep-fried gardener (ME!) in my greenhouse!
I anticipate this routine to go on for a few more weeks until summer finally gives up and I can permanently shut down the misters until next summer.
Tuesday, September 23, 2008
09/23/2008 - Orchid Detox: Update
All the plants are growing nicely.
So far they do not seem to miss all the other supplemental ingredients that I used to give them.
But it is still too early at this point to tell if the new feeding regimen is better than the previous system.
So far they do not seem to miss all the other supplemental ingredients that I used to give them.
But it is still too early at this point to tell if the new feeding regimen is better than the previous system.
09/23/2008 - C. Hawaiian Wedding Song self pollination update
Here's a picture of the seed pod today.
This thing is growing fast.

This thing is growing fast.

Thursday, September 18, 2008
09/18/2008 - C. Hawaiian Wedding Song self pollination update
Since the two seed pods were visibly swelling and developing well, I decided to cut away one of the seed pods to allow the plant to focus energy on the single remaining pod. I believe that this will give one seed pod a better chance of growing properly instead of having the plant divide its resources to sustain two seed pods.
I will keep you posted on the progress of the seed pod in the coming months.
I will keep you posted on the progress of the seed pod in the coming months.
Tuesday, September 16, 2008
09/16/2008 - New Hybrid attempt failed
I checked the ovary of the pollinated cattleya this morning and it was turning yellow.
Clear signs that the pollination did not take place.
There are a couple of reasons why it could have failed.
1. I did not properly insert the pollinia into the stigma.
2. The two hybrids are probably incompatible.
Another remote possibility is that the Caulocattleya Chantilly Lace (Diacattleya) is a sterile hybrid. I will need to research that some more.
This was the hybrid attempt between the Cattleya Hawaiian Wedding Song 'Virgin' and Caulocattleya Chantilly Lace 'Twinkle' (Syn. Diacattleya)
Tuesday, September 09, 2008
Attempting a new orchid hybrid
This afternoon I have decided to attempt hybridizing two orchids that I have in the greenhouse.
Pod parent: Cattleya Hawaiian Wedding Song 'Virgin'

Pollen Parent: Caulocattleya Chantilly Lace 'Twinkle' (Syn. Diacattleya)

Comparison of the plant and flower sizes of the parents:


Pollen removed from the pollen parent:

Pollen attached to the stigma of the pod parent:

So in a few months I will find out of the seed pod is viable and will then attempt to germinate the seeds.
If that process is successful, then I have between four to eight years to wait if this breeding results in any desirable flowers.
John
Sunday, September 07, 2008
09/07/2007 - Diacattleya Chantilly Lace 'Twinkle' HCC/AOS
I have had a hard time trying to get this plant to bloom successfully. It had produced inflorescences in the past but the flower buds keep failing at the last moment.
This time it produced two inflorescences with only two flower buds each. The buds did not fail though, and here is a close up of one of the flowers.

This orchid is synonymous to Caulocattleya Chantilly Lace 'Twinkle' HCC/AOS.
This time it produced two inflorescences with only two flower buds each. The buds did not fail though, and here is a close up of one of the flowers.

This orchid is synonymous to Caulocattleya Chantilly Lace 'Twinkle' HCC/AOS.
09/07/2008 - Orchid Pollination Attempt
I attempted a self crossing of two C. Hawaiian Wedding Song 'Virgin' flowers friday afternoon.
It looks like the flowers recognized the pollination attempt and the ovaries are visibly swelling.
Since it takes several months for the seed pods to mature, it will give me time to gather all the necessary materials for seed flasking.
I will also take this time to practice making some flasks to make sure that I have the routine and techniques down before attempting on real orchid seeds.
Here's a picture of the two seed pods growing:

Tuesday, September 02, 2008
09/02/2008 - Greenhouse Update
The orchids are looking good. They seem to be weening away from the supplements just fine. They are now on a strict diet of balanced fertilizers.
I have a couple of orchids that have been doing poorly for the past couple of years (poor foliage growth, no blooms, etc) and I have grouped them together for closer observation. The plan is that if they still do not improve, then they will be tossed into the compost pile to free up bench space. It is cruel maybe, but I'm not fond of using my greenhouse as an orchid ICU.
I have a couple of orchids that have been doing poorly for the past couple of years (poor foliage growth, no blooms, etc) and I have grouped them together for closer observation. The plan is that if they still do not improve, then they will be tossed into the compost pile to free up bench space. It is cruel maybe, but I'm not fond of using my greenhouse as an orchid ICU.
Friday, August 29, 2008
08/29/2008 - In Bloom Today - Howeara Lava Burst 'Puanani' AM/AOS-HOS
These orchids were a gift from a friend of mine some time ago. They did not bloom the first season that I received them as they were probably still adjusting to the greenhouse conditions.
This year is different however, as you can see from the pictures below.
These two orchids (along with some of my other oncidinae orchids) are grown in semi-hydroponic culture or S/H.


This year is different however, as you can see from the pictures below.
These two orchids (along with some of my other oncidinae orchids) are grown in semi-hydroponic culture or S/H.


Thursday, August 28, 2008
08/28/2008 - Back after two weeks
I took my family to the Bahamas for two weeks for some R&R and the orchids were on their own during that time.
The greenhouse has enough automated features to keep the temperature and humidity in check, so I was not so concerned with the orchids there.
None of the devices failed, Woohoo!.
The mister timers, thermostat-controlled exhaust fan and assorted mechanicals all worked great despite being left alone for a couple of weeks.
The patio orchids however, needed someone to come in every few days to water them.
I am happy to say that all the plants are doing well despite being virtually unattended for two weeks.
It looks like some critters are still coming into my backyard and digging up my bulbs outside of the greenhouse. I am now looking into purchasing an electronic pest repellent to see if it would help.
Wednesday, August 06, 2008
08/06/2008 - Mounted Orchids
Mounting orchids is more than just slapping on a plant to a driftwood. It takes careful attention to detail to make sure that the plant's growth habit complements the driftwood's shape and scale.
The mounted piece should become a homogeneous entity. Plant and substrate should be viewed as one living creature and not a bunch of building blocks that you can dismantle and reassemble at will.
It is also important to understand the properties of the wood being used. Mounting an orchid to a wood that easily rots within six months is rarely a worthwhile excersize.
Here are some of the orchids that I have mounted on driftwoods, to show their progress after one year or so.
Dendrobium (NOID) on a dense river driftwood. July 2007.

This is the same piece in April 2008.
Notice that the inflorescence's arch is consistent with the arch of the driftwood. Coinsidence? or careful pairing of the plant and substrate? you be the judge :)

Here is a recent photo of the plant. July 2008.

Here is another dendrobium (NOID) mounted to a dense river driftwood. June 2007
I tried to orient the plant so that the direction of new growth faces towards the left side the driftwood. My hope is that the orchid's new canes will crawl across the remainder of the wood.

Here is a recent photo of the plant. July 2008
So far the plan seems to be working.

Cattleya guttata mounted to a similar dense river driftwood. June 2007
Cattleya roots tend to ramble on, so I mounted the plant in a higher spot than usual to give the roots room to roam.

Here is a recent photo of the mounted orchid. July 2008
It has only been one year but the roots have already reached the outer edges of the driftwood.

Other works in progress:
Dendrobium (NOID) on a dense river driftwood oriented vertically. July 2008
This was a keiki mounted a few months prior to this picture. The roots have already taken hold of the driftwood.

Two Cattleya aurantiaca orchids mounted on a dense river driftwood. July 2007.
I intended this to be a compound piece, with two identical plants in the upper and lower sections of the driftwood.

This is a recent photo of the mounted Cattleya aurantiaca. July 2008.
Only the lower orchid survived, and I decided to keep the upper section empty.
Even with our best efforts, some orchids are bound to die. Thats just the way it is.


Saturday, August 02, 2008
08/02/2008 - Orchid Detox: Fertilizer feeding
As scheduled, I performed a fertilizer feeding on all the orchids with a balanced fertilizer at 1/2 tsp/gal.
At this point, I believe that I am the one suffering most from "supplement withdrawal" as I was so tempted to add in those other trace ingredients in my supply container.
I must stay the course though, in the name of science!
At this point, I believe that I am the one suffering most from "supplement withdrawal" as I was so tempted to add in those other trace ingredients in my supply container.
I must stay the course though, in the name of science!
08/02/2008 - GRRRRR! Moles!
Not orchid related, but still very aggravating when this happens to your garden.
Moles, voles, gophers, whatever those devious creatures are, they have dug burrows under my backyard and ate the roots of mature blooming aloe vera plant and a two year old banana tree.
I noticed when I was inspecting the garden this afternoon that the aloe vera was tipped on its side and the banana tree was leaning at an extreme angle.
I first thought maybe the winds did it but we did not get any high winds yesterday or last night.
Once I touched the aloe vera plant, it just fell over and saw a hollow chasm where the roots and stem should have been.
I then went to the banana plant and gave the top leaf a gentle tug, and the entire plant came with it. Again, the entire base was missing.
I dont have much experience dealing with these vermin but it looks like I will need to start reading about them and the control methods.
Friday, August 01, 2008
08/01/2008 - General greenhouse notes
1. It was very hot today (95F outside) and the greenhouse plants were quite dry. So I decided to do a full watering early afternoon.
The plants' leaves were dry by the time I did my last inspection at 7:00PM.
2. I had two 30gal plastic tubs (I think they are 30gal) that I used to store water and just act as a small scale heat sink and moisture battery inside the greenhouse.
I was beginning to smell some foul odor in the water so I decided to drill a hole along the side of each tub to drain the water. Once the water drains, I will clean the tubs and seal the holes and refill with clean water.
08/01/2008 - Some random pictures around the greenhouse
Here are the two oscillating desk fans that help with air circulation in the greenhouse.

Maxillaria tenuifolia recently repotted into a 6" wood basket.

Blc. Magic of Mishima 'Volcano Queen'

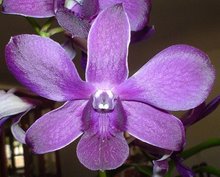
Dendrobium Blue Violetta

Cattleya Hawaiian Wedding Song 'Virgin'


Maxillaria tenuifolia recently repotted into a 6" wood basket.

Blc. Magic of Mishima 'Volcano Queen'

Dendrobium Blue Violetta

Cattleya Hawaiian Wedding Song 'Virgin'

Thursday, July 31, 2008
07/31/2008 - Updates finally caught up
Alright, I have finally updated this blog to contain all my previous notes stored on other media.
From now on I will be able to keep a journal of the progress of the orchids in general, as well as the Orchid Detox experiment.
Stay tuned for more updates.
John
From now on I will be able to keep a journal of the progress of the orchids in general, as well as the Orchid Detox experiment.
Stay tuned for more updates.
John
07/31/2008 - Greenhouse and Patio Setup (Part 2 of 2)
The Patio
The patio is on the eastern side of the house and gets direct morning sun up to around 10:00AM. After that, all light are incidental light as the house and patio cover blocks all the direct sun.
This is where I grow my "outdoor" orchids such as cymbidiums, reed stem epidendrums, etc.
This is a fairly simple setup. I have a metal frame placed on top of two plastic shelving units to that the plants are raised about 2 feet from the ground. On top of the shelves are the cymbidiums and other orchids that prefer a lot of light, and below them are seedlings or cuttings of non-orchid plants that need some protection from the sun.
Cymbidiums can tolerate winters as cold as 40F. But if it gets colder than that, I bring the cymbidiums inside the garage or inside the greenhouse.
Here is a picture of the east patio setup:

07/31/2008 - Greenhouse and Patio Setup (Part 1 of 2)
Now that I have synched up this blog with what I had on my notebook, I would like to take the time to give a quick rundown of my current greenhouse (Part 1) and patio (Part 2) growing area setup.
The Greenhouse
The greenhouse (or GH) is a Rion Prestige 8.5'x16' greenhouse kit (see earlier posts for construction details).
This is the primary growing area for most of my orchids.
The greenhouse is at a North-South orientation, with the front of the greenhouse facing north. In colder climates, facing the doors north is a big no-no. But in the warmer Riverside climate this is not much of an issue.
Ventilation
I have two intake windows on the south end of the greenhouse, and both are controlled by temperature controlled vent openers. These pistons contain a resin that expands when the temperature rises, and contracts when the temperature drops. I have these windows roughly calibrated to be fully closed at 70F, and fully open at 80F.
I have three roof vents that are positioned at set intervals on the greenhouse roof. These roof vents are also controlled by similar vent openers as the intake windows. With the roof vents and intake windows, the greenhouse can have some level of passive ventilation as the hot air goes up the roof vents and draws cooler air through the intake windows.
During the Riverside summers though, passive ventilation is not enough.
Here is a picture of the south-west roof vent. The misting system in the picture is an old kit and has since been replaced.

I have a 16" 2000CFM exhaust fan mounted on the north side of the greenhouse. This side receives the least wind compared to the other three directions, so it gets the least resistance when the exhaust fan tries to remove the warm air from inside the greenhouse.
This exhaust fan is hooked up to an inline thermostat that I have calibrated to activate at 75F. Obviously this exhaust fan sees a lot of action during the summer months.
HAF (Horizontal Airflow Fans) - I have the following fans set up for proper air distribution inside the greenhouse:
* One 12" electric fan hung from the roof at the south end of the greenhouse.
* Two 6" oscillating desk fans placed on a shelf, about 3 feet apart along the eastern wall of the greenhouse.
This is the 12" fan on the southern end:

Shading - I use the following materials to reduce the sunlight entering the greenhouse:
* Aluminet 60% shade on the exterior of the greenhouse. It covers the entire roof, the west and east walls.
* Cut sections of generic 50% shade fabric (green) placed on the interior roof and walls of the greenhouse to provide additional shade to plants as necessary.
Misting System - I have set up a misting system to provide additional cooling to the greenhouse during the hot summer months. The idea behind the misting system is that the tiny water droplets exiting the nozzles quickly evaporate and thus reducing the air temperature temporarily.
The misting line has 18 low-flow brass mist nozzles distributed throughout the greenhouse interior.
I have the misting line hooked up to a programmable watering timer, that is set up to activate for 1 minute every 30 minutes. This misting cycle runs from 10:00AM through 5:00PM during the hot summer months. I then cut down on the misting schedule as the season gets cooler. The misters are completely off by November through March.
The misting line is also hooked up to an inline polyphosphate filter to reduce the calcium contents of the water and minimize calcium deposits on the plants' leaves.
This misting system is used exclusively for cooling purposes, and not for irrigation.
*Note: The old misting kit was a 6-nozzle kit, and requires 10 minutes per run to reach the desired temperature and humidity levels inside the greenhouse.
The new 18-nozzle misting kit allows me to reach the desired levels within 1 minute.
Heating - Believe it or not, I need to heat the greenhouse during the winter. Granted that we dont get several feet of snow (we rarely get snow actually), the winter temperatures are still cold enough to kill most unprotected orchids.
I use an electric oil heater that is rated for rooms up to 400 square feet. This heater keeps the interior temperatures above 50F (Although I have been advised recently that I should keep it above 60F. I will be attempting that this winter).
This is the heater that I use:

Orchid Detox - Notes from 07/29/2008
These are notes that I am copying over from the notebook.
07/29/2008
1. Repotted a Maxillaria tenuifolia into a 6" wood basket with a combination of small orchid bark and sphagnum moss.
* The 5" plastic pot was not providing enough bottom weight and the plant constantly tips over due to the height and weight of the foliate.
2. Watered the orchids in the greenhouse and in the patio.
3. EARTHQUAKE! 5.4 magnitude, epicenter estimated to be in the Chino Hills area.
Orchid Detox - Notes from 07/28/2008
These are notes that I am copying over from the notebook.
07/28/2008:
General observations
1. C. Hawaiian Wedding Song 'Virgin' orchids are at different stages of flowering.
* Flowers open
* Buds breaking sheath
* Buds forming in sheath
* Failed to bloom (buds died inside sheath)
2. C. Chocolate Drop 'Kodama' repotted into empty wood basket (previously from basket with lava rock).
* This change in culture is not officially part of the experiment.
* The combination of lava rocks and high summer temperatures in my area is causing problems for the plant's roots. Several root tips are showing "burns" - perhaps due to the lave rocks staying too warm during the day.
3. Other orchids are at varying stages of growth.
* Pseudobulbs
* Roots
* Leaves
4. One of the Howeara Lava Burst 'Puanani' has produced three spikes. One is noticably more robust than the other two. All three are coming from the same pseudobulb.
5. Vanda seedlings (estimated 5 and 3 years from blooming) are growing roots.
* Mounted on wood branches
* Potted in LECA (non-S/H)
* Potted in Fern baskets (empty)
Orchid Detox - Notes from 07/27/2008
These are notes that I am copying over from my paper notebook.
07/27/2008:
* Prepared experiment logbook (this is what I will be referring to as THE notebook from this moment onward)
* Prepared fertilizer feeding schedule (see previous post)
August 2008 is set up as a "light" fertilizer feeding schedule. Feeding will only be performed in August 2 and 30.
This light feeding schedule is to allow the plants to consume or expend all residiual reserves of unwanted substances before regular feeding schedule commences.
Unwanted Substances
* This phrase is only for the purpose of this experiment. Although these substances are not considered harmful to the plant, I do not want them on the plants during this experiment window.
* The experiment is to measure long term plant performance without these substances.
* For the purpose of the experiment, these substances are listed:
1. Superthrive
2. Sea Weed Extract
3. Pro-Tekt
4. Epsom Salt
Orchid Detox - Fertilizer Schedule
Feeding schedule for 2008-2009, with "balanced" 20-20-20 fertilizer product.
1/2 tsp/gal
Aug 2, 30
Sep 13, 20, 27
Oct 11, 16, 25
1/4 tsp/gal
Nov 8, 15, 22
Dec 6, 13, 20
Jan 3, 10, 17, 31
Feb 7, 14, 28
1/2 tsp/gal
Mar 7, 14, 28
Apr 4, 11, 25
May 2, 9, 23, 30
Jun 6, 21, 27
Jul 4, 18, 25
* I will be doing my best to stick to this schedule. However, I reserve the right to deviate from this schedule for reasonable exceptions (health, weather, someone buys me a ticket to Hawaii, etc)
1/2 tsp/gal
Aug 2, 30
Sep 13, 20, 27
Oct 11, 16, 25
1/4 tsp/gal
Nov 8, 15, 22
Dec 6, 13, 20
Jan 3, 10, 17, 31
Feb 7, 14, 28
1/2 tsp/gal
Mar 7, 14, 28
Apr 4, 11, 25
May 2, 9, 23, 30
Jun 6, 21, 27
Jul 4, 18, 25
* I will be doing my best to stick to this schedule. However, I reserve the right to deviate from this schedule for reasonable exceptions (health, weather, someone buys me a ticket to Hawaii, etc)
Current Orchid Bloomers July 31 2008

From left to right:
Blc. Magic of Mishima 'Volcano Queen',
Den. Blue Violetta, Phal. NOID,
Enc. prismatocarpa,
Gramm. Scriptum var. citrinum 'Hihimanu' 4N,
C. Hawaiian Wedding Song 'Virgin',
Phal. (P. Sweet Moon x P. Cygnus) x (P. Taisuco Sheen x P. Carmano Show)
Close Ups
Encyclia prismatocarpa


Blc. Magic of Mishima 'Volcano Queen'

Orchid Detox - The Experiment Begins
I just thought I'd share with you what I am planning to do with my orchid care regimen.
Now that I have a greenhouse and I have some significant control to counteract what Mother Nature throws at me, I feel it is time to strip clean my feeding regimen and go back to a simplified feeding regimen for a couple of years and see what happens.
When I was taking an inventory of what I feed my plants, it is amazing that I still have not appeared on the Department of Homeland Security watch list.
Here are the items that I have on my feeding regimen.
I feed weekly, 3 weeks out of 4, with the 4th week just watering to flush.
Fertilizer based on season (soluble powder, 20-20-20 balanced, 6-30-30 bloom, and 30-10-10 foliage) 1/2 tsp/gal every feeding.
Superthrive - 1/8 tsp/gal every feeding.
Sea Weed extract - 1 tsp/gal every feeding.
Pro-Tekt - 1/8 tsp/gal every feeding.
Epsom salt - 1/2 tsp/gal every feeding.
It is possible that all these ingredients mixed together are ending up with a solution that is so saturated that it becomes counter-productive to the plant growth.
I may be giving the plants something that they just end up discarding, or worse, something that is actually harming them.
So this is my plan:
1. Starting August 2008, I will reset to using just the 20-20-20 balanced fertilizer and Superthrive for 3 months and observe the plants.
It is possible that some plants would manifest "withdrawal" symptoms from the omission of their usual "goodies". But the situation should stabilize as the plants make adjustments.
This new fertilizer mix will be administered weekly, 3 weeks out of 4.
20-20-20 Fertilizer 1/2 tsp/gal.
*Superthrive 1/8 tsp/gal. - After some thought, I have decided to remove Superthrive from the first year of the experiment.
2. First observation window - 3 months (Aug-Oct 2008).
I will observe the plants' response and performance, and continue with the feeding regimen.
The plants are probably still experiencing some transition shock during this time, but should be minimal.
3. Second observation window - 3 months (Nov-Jan 2008-2009).
I will observe the plants' response and performance.
This also goes into our winter season so this fact will be considered when measuring plant performance as some plants naturally go dormant in winter.
4. Third observation window - 3 months (Feb-April 2009)
I will again monitor the plants' performance during the sprouting season (new pseudobulbs and roots) as they wake up from the winter rest.
5. Fourth observation window - 3 months (May-July 2009)
This is the active growing season for me. I will observe the plants performance.
6. Repeat the process for 1 more year (without altering the feeding regimen from the first year of the experiment)
At the conclusion of the first year (July 2009) I will compare the plants' performance to the previous year, quarter by quarter.
I will then be able to make a reasonable statement whether the simplified feeding formula has produced better results or worse results compared to my original "fat" formula.
Some considerations:
1. Feeding is not the only factor that influences plant performance. There might be plants that do better next year because I learn more about their individual quirks and thus they respond and perform better as I get to know them more. The plants will also be older next year, so that will account for more robust growth regardless of feeding regimen.
2. If a plant is suffering from any form of disease or infection, I will take the usual steps to cure the plant, even if it involves giving it other chemicals as needed. This plant will then be marked so that this fact is accounted for when it is time to compare the annual performance of the plants.
3. If a particular plant is sulking because of non-disease related factors (it does not like my greenhouse temperature, humidity, etc) and it appears that these plants are a very small fraction of my collection, I will not compensate for environmental factors by giving the plants any of those "miracle products" that supposedly help the plant tolerate warmer or cooler or drier conditions, etc. If the plant's preference is outside of my growing environment conditions, that plant will be traded or discarded in any other means possible.
I am no longer bending over backwards for one plant, at the expense of the rest of my collection. :)
Possible results:
1. Bad: The plants show less vigor and lower quality blooms compared to the previous year.
If this is the case, then I will slowly introduce new supplemental products to my feeding regimen (one by one) and go through a reasonable observation period.
2. No Difference: Plants show the same vigor and bloom quality compared to the previous year.
This would indicate that my "fat" feeding regimen was just resulting in wasted supplemental products which translates to money ill-spent.
3. Good: Plants show more vigor and better quality blooms compared to the previous year.
This is unlikely, but hey it is a possibility. This could be a case where "less is more" applies.
4. Catastrophic: I buckle and abandon the experiment.
If this happens, then I am probably forever an "orchid fashion slave", buying every single "miracle product" advertised on orchid magazines that claim to give my plants super large flowers.
Admittedly, this will require TONS of discipline on my end. Not only do I need to take notes on my experiment faithfully, but I also must resist the urge to reintroduce my old chemicals into the feeding regimen.
If the simplified feeding regimen produces positive results, then it will be a better gardening experience for me.
1. The plants will be happier.
2. I have an easier time preparing the fertilizer.
3. My wallet will thank me too.
My hypothesis:
Excessive "performance enhancing" products are counter productive to orchid plant and flower quality.
The plants were regularly dosed with "performance enhancing" ingredients advertised to promote better plant growth and more beautiful flowers and better tolerance to environmental stress.
With this experiment, I intend to validate if the substances:
1. Are working as advertised and do deliver better plant performance.
2. Are actually hindering the plant's growth instead of enhancing it.
3. Are doing nothing at all and is causing a placebo effect on the growers.
The main process will be a "reverse process" experiment.
Instead of introducing suspected harmful substances to previously sterile subjects, the suspected harmful substances will be omitted from the test subjects already exposed to said substances.
**Imagine an experiment where you deflate a helium balloon to see if it loses altitude, as opposed to introducing helium into a balloon to see if it gains altitude.
**Another experiment of this fashion is to have a frequent aspirin user stop taking aspirin to see if the mysterious symptoms stop occurring.
Wish me luck, and May The Chlorophyll Be With Us!
John
Greenhouse Kit Fever
I am sure I am not the only one who experienced "greenhouse kit fever" when we built our greenhouses for the first time.
The symptoms are all too familiar:
Stage 1: We see a beautiful picture of a "naked" greenhouse complete with plants inside and the model was happily working inside under direct sun.
*** Little did we know that the model probably was hospitalized for heatstroke after the photo shoot and all the plants were chucked since they were toasted beyond saving.
2. We buy the greenhouse kit and suddenly there is a big dent in our bank account.
3. The kit arrives and we are filled with a sense of dread as the crew unloads box after box in what seems to be an infinite march of movers.
4. We finally complete the construction and everything looks just like the picture on the advertisement.
*** But something is amiss.
5. The greenhouse is too hot at daytime!, even in the middle of february. The plants are roasting inside.
6. We do our research and find out what we need some form of shade material to protect the inhabitants from direct sun.
"Shade cloth? But the advertisement picture did not show any shade cloth!"
7. We purchase the said shade material. But it still gets too hot.
8. We do more research and find out what we might need an exhaust fan. "What? but the picture did not show any exhaust fans".
9. We then buy an exhaust fan and think everything is ok. But wait, something is still missing. There are still hot spots in the GH despite the exhaust fan.
10. We do more research and find out we might need an HAF, or two or three. We then do some more research to find out what the heck an HAF is.
"HAFs? But the picture! the picture!"
11. So we grudgingly get HAFs and finally everything feels right inside the greenhouse. Its not getting too hot and the interior is no longer burning under the sun.
12. But... Come winter the interior gets too darned cold.
13. Back to the internet we go to find out that we need to insulate the panels with bubble wrap and get a reliable heater.
***By this time you already grabbed that beautiful picture of the greenhouse and ripped it to shreds because YOUR greenhouse now looks nothing like that supermodel greenhouse in the magazine.
14. So after all the dust settles, we FINALLY get to enjoy the greenhouse. So we go inside to calm our nerves and lower our blood pressure.
*** Little did we realize that there really was no net lowering of blood pressure. We only think that way because our blood pressure shot up so high during steps 2 through 13 and it is just getting back down to where it started. :)
Happy Growing,
John
Subscribe to:
Posts (Atom)
